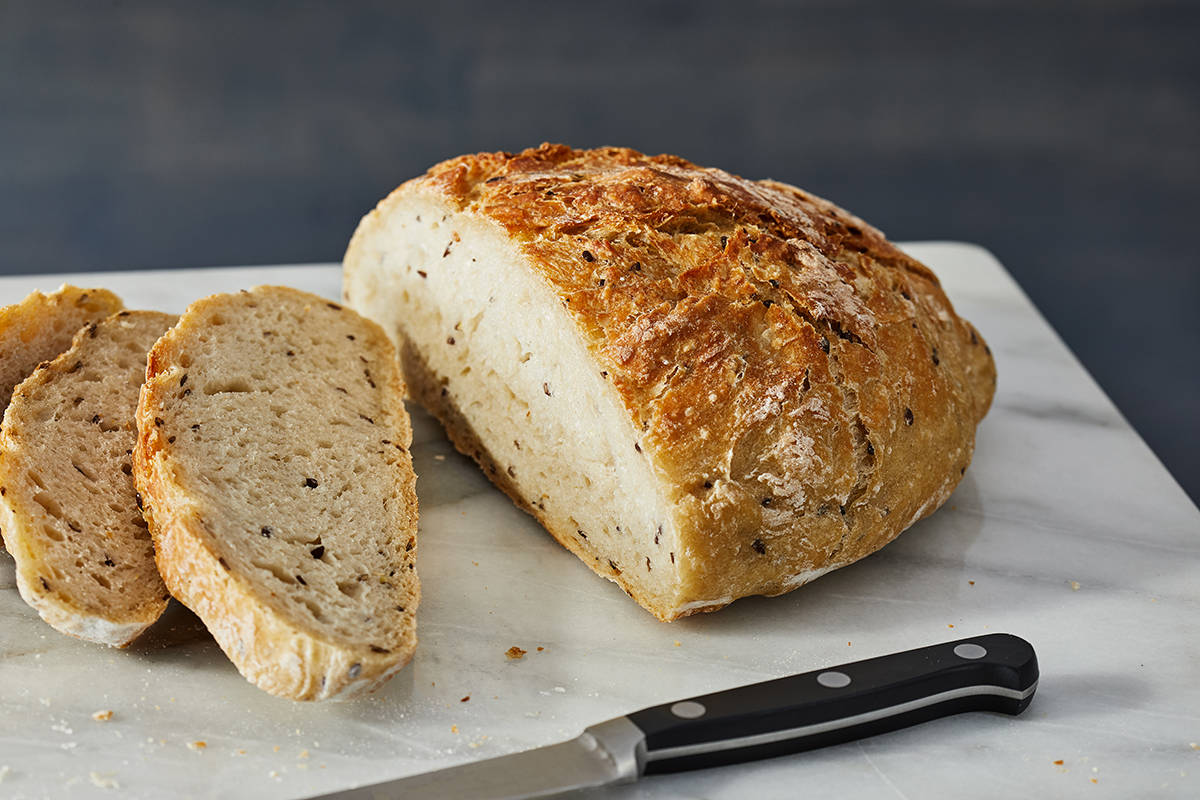
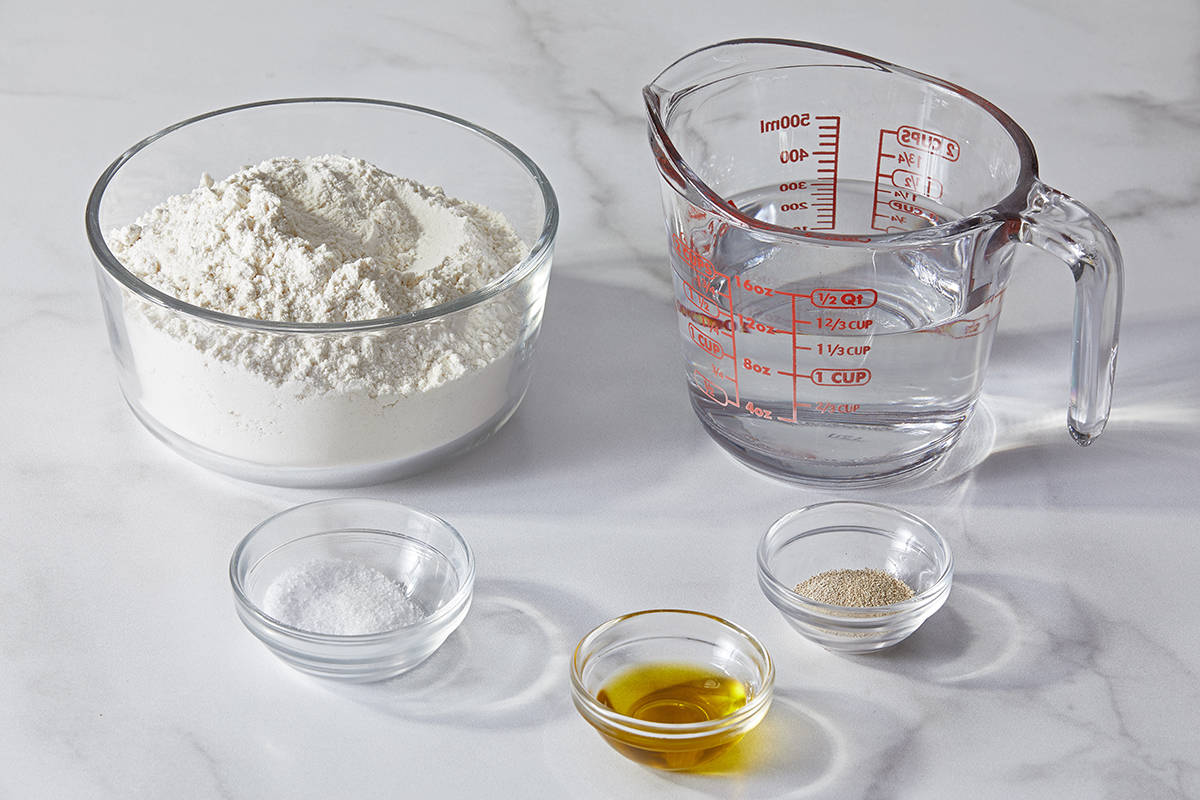
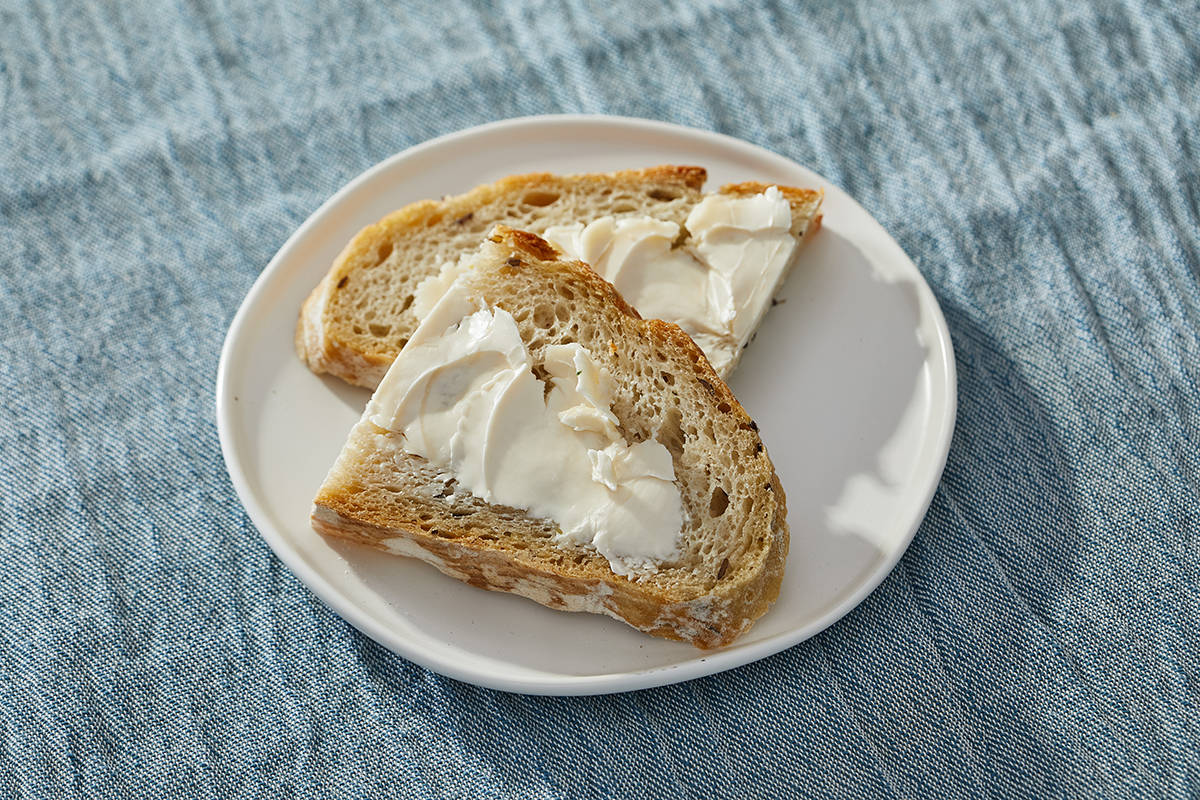
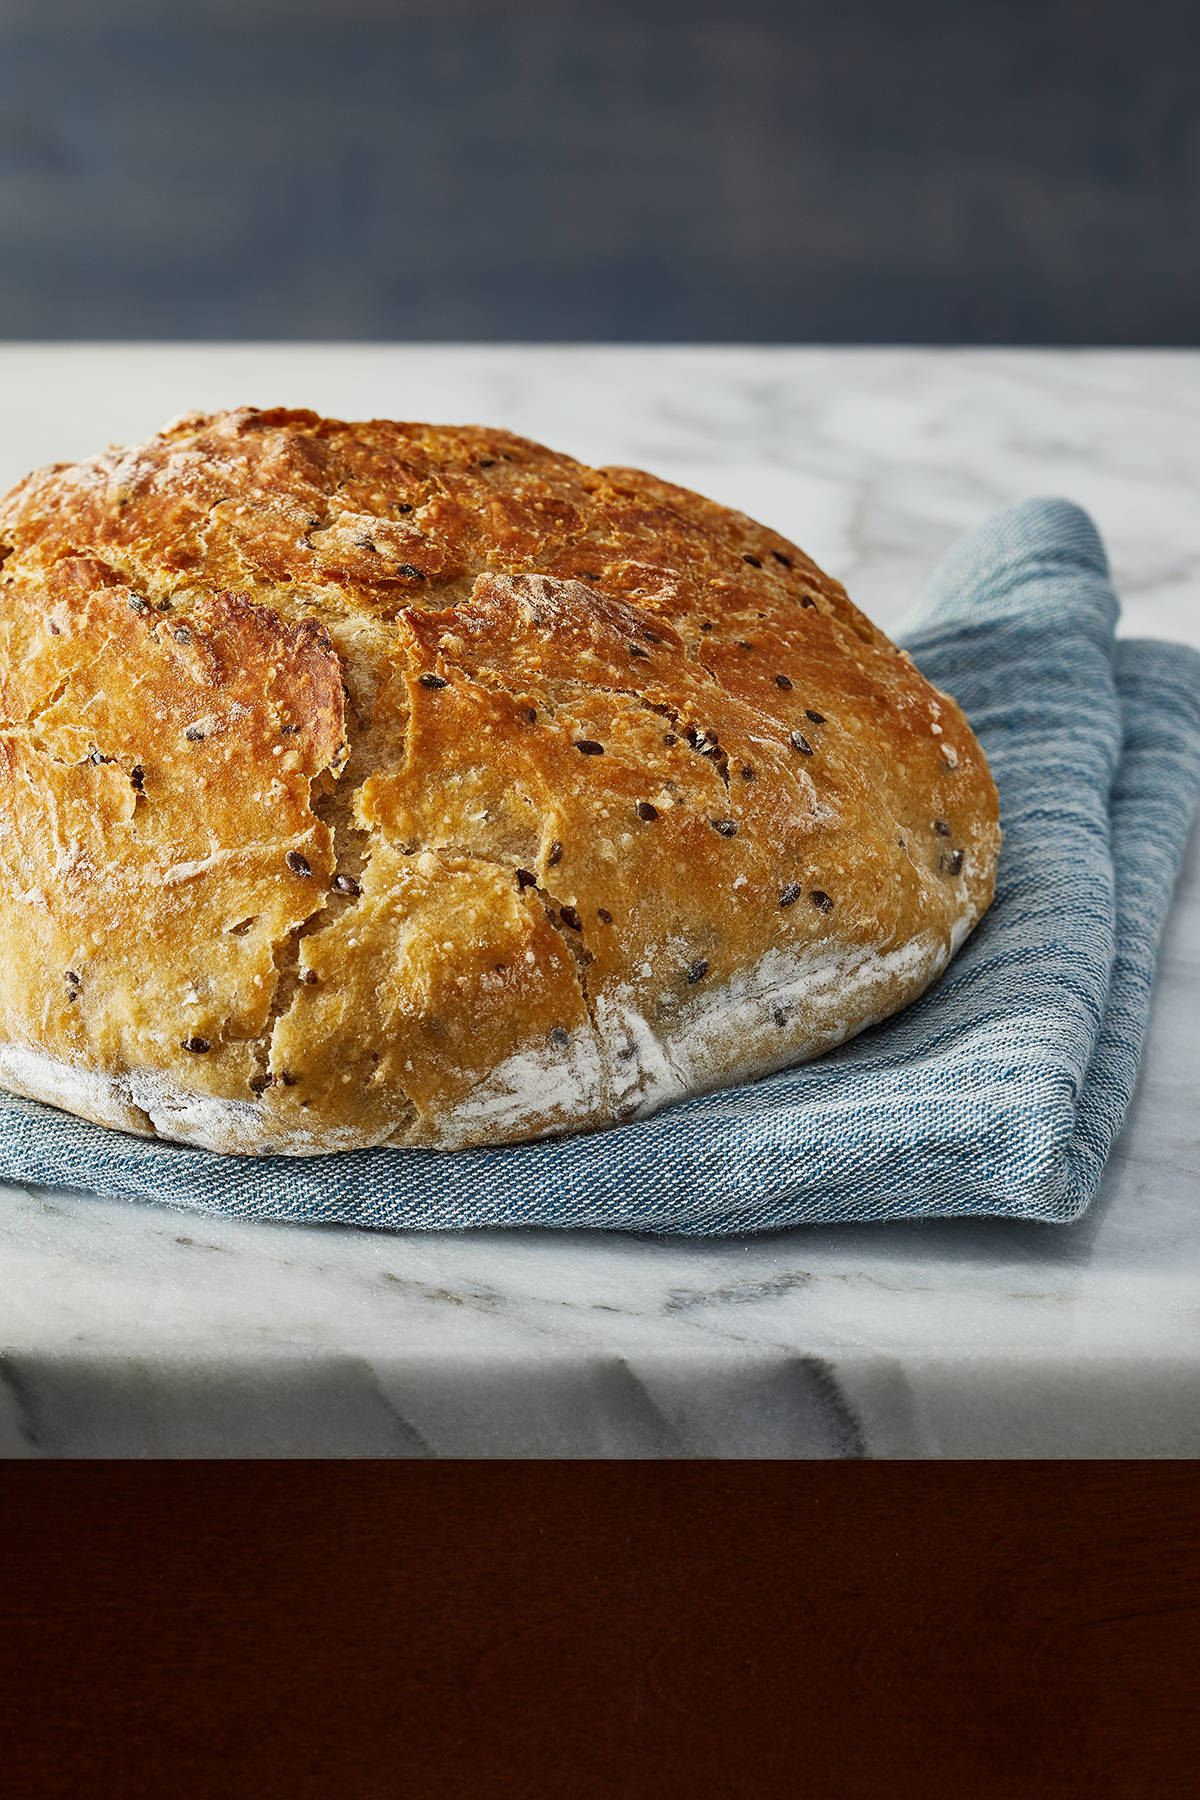
 (Photos by Tom McCorkle for The Washington Post; food styling by Lisa Cherkasky for The Washington Post) | Week 4: The secret to a stellar, crusty loaf of bread Here's how the best bakers do bread at home: First thing in the morning, they go to the best bakery in town to buy a fresh loaf of still-warm, crusty brown bread and a cup of piping hot coffee. That's right, even bakers leave their kitchens to buy the best bread. In my opinion, the most delicious bread has a thick, almost gnarly crust that, with the bite of a serrated knife, gives way to a light and tender crumb dotted with generous air pockets perfect for catching schmears of soft butter. That's excellent bread, and excellent bread takes time, planning and a very hot oven. Guess who is consistently on top of all those things? The best bakery in town. Because baking bread takes time, planning and a mega amount of heat, I think of it as a ritual. Sure, sometimes that ritual leads me to my favorite bakery in New Orleans, but there's also a way to coax the same sort of baking magic out of my very own oven. My home-bread ritual involves a very long rise and a Dutch oven. This week's lesson has us dipping our toes into baking with yeast. We'll stir together a no-knead, shaggy dough and let it rest, rise and bubble for between 8 and 14 hours. That's plenty of time for us to get in a day's work (or a night's beauty sleep) before shaping and ultimately baking our fresh bread. Over its rest time, the bread will develop the flavor, gases and gluten structure key to a stellar, crusty loaf. The crustiest breads come from super-hot ovens injected with steam. Most of us don't have a steam oven at home, but a Dutch oven is a totally comparable baking hack, as it creates an oven within the oven, which is perfect for bread. A Dutch oven will hold steam close to the bread as it bakes and keep a steady (very hot!) temperature. The result of this long-rising, no-knead bread is a crusty, tender, aerated, flavorful loaf. If it feels like absolute magic, that's because it is. This bread is a wonder, and a true testament to time and heat. Of course, we'll still head to our favorite bakery, but maybe most days from here on out, it'll just be for coffee. Baking at altitude? Check out this handy guide with tips for making slight adjustments to achieve the results you're after.  | This week's toolbox | Here's what you'll need to nail this week's recipe: Dutch oven: This heavy, cast iron (often enameled) lidded pot holds heats like a champion and creates an oven within the oven when we're baking bread. It's also great for one-pot meals, frying and making big batches of soups and stews. Instant yeast: A readily available powdered commercial yeast. I like instant yeast because, as the name suggests, it activates instantly in the presence of liquid and flour and doesn't need to proof in warm water. For new bakers, instant yeast is super simple to work with.  | Recipe | Overnight Dutch Oven BreadThe keys to this deceptively simple loaf of bread are time and a Dutch oven. Both allow the dough to ferment slowly, developing flavor and gluten structure without kneading. The dough will be extremely wet and you may find it tricky to work with, but its texture will ensure a moist, soft crumb at the end. A hot Dutch oven creates a double oven of sorts, trapping precious steam around the bread as it bakes and creating a crusty and golden loaf. While the grits and flaxseeds are optional, I highly recommend adding them for texture. And as you get more comfortable with baking bread, experiment with different flours — try swapping out half the all-purpose flour for whole-wheat flour to see how the taste and texture change. For easy printing and scaling, view this recipe on our website at washingtonpost.com/recipes. IngredientsMakes one 8-inch round loaf (8 to 10 slices)
Prep time: 20 mins, plus 14 hours rising time
Bake time: 55 to 60 mins 3 cups (375 grams) flour, plus more for kneading the dough
3/4 teaspoon instant yeast
1 3/4 teaspoons kosher salt
2 tablespoons uncooked grits (optional)
1 tablespoon flaxseeds (optional)
1 1/3 cups (319 milliliters) warm water
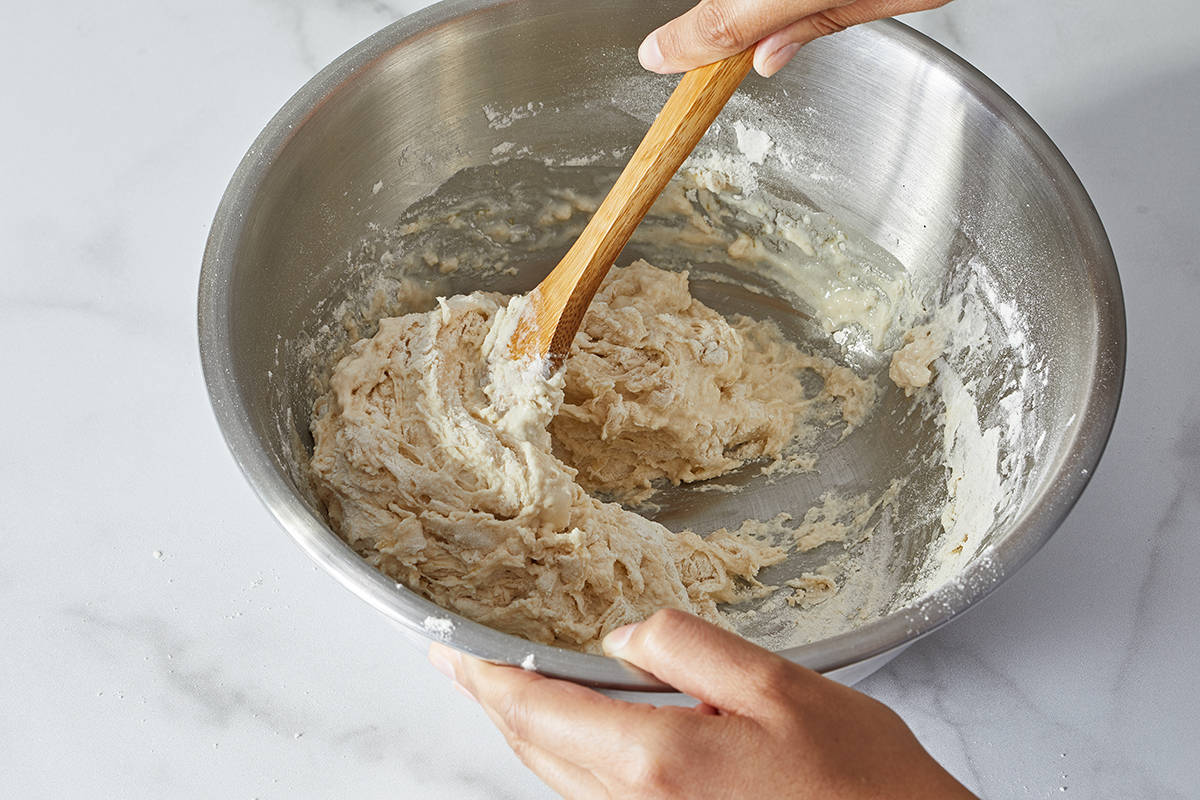
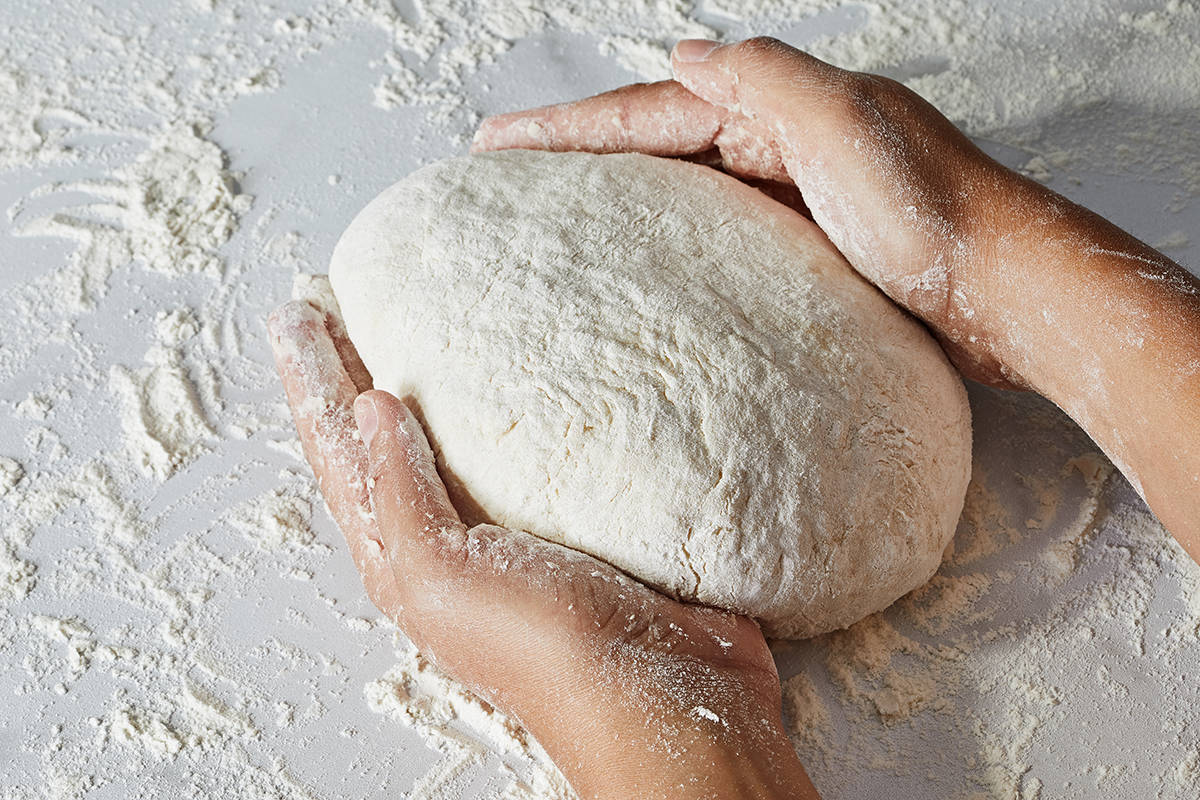
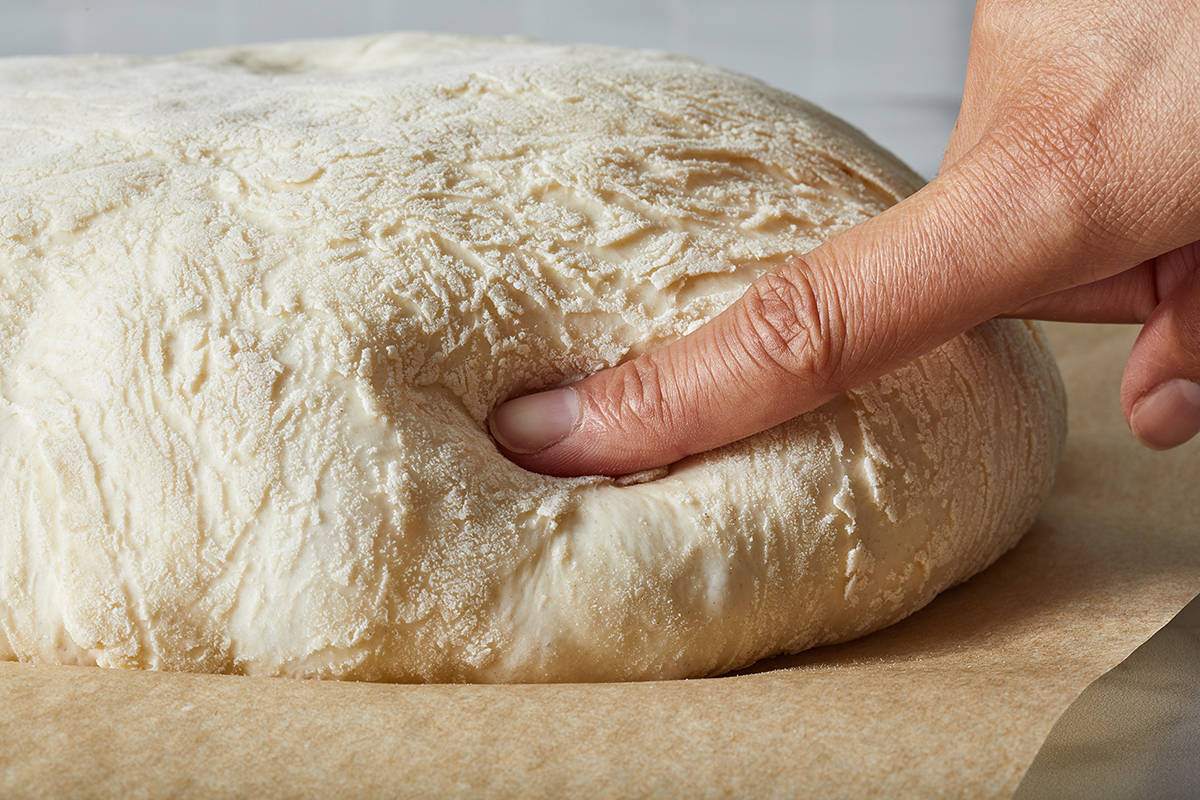
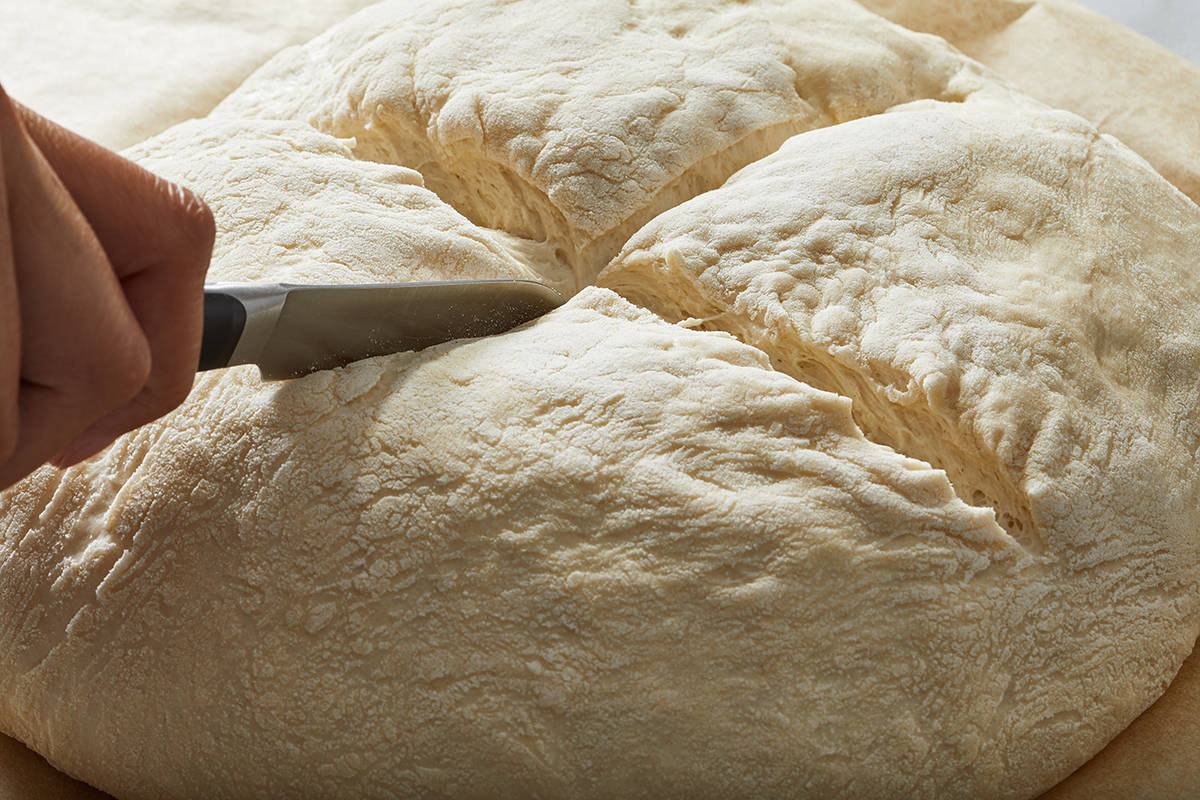
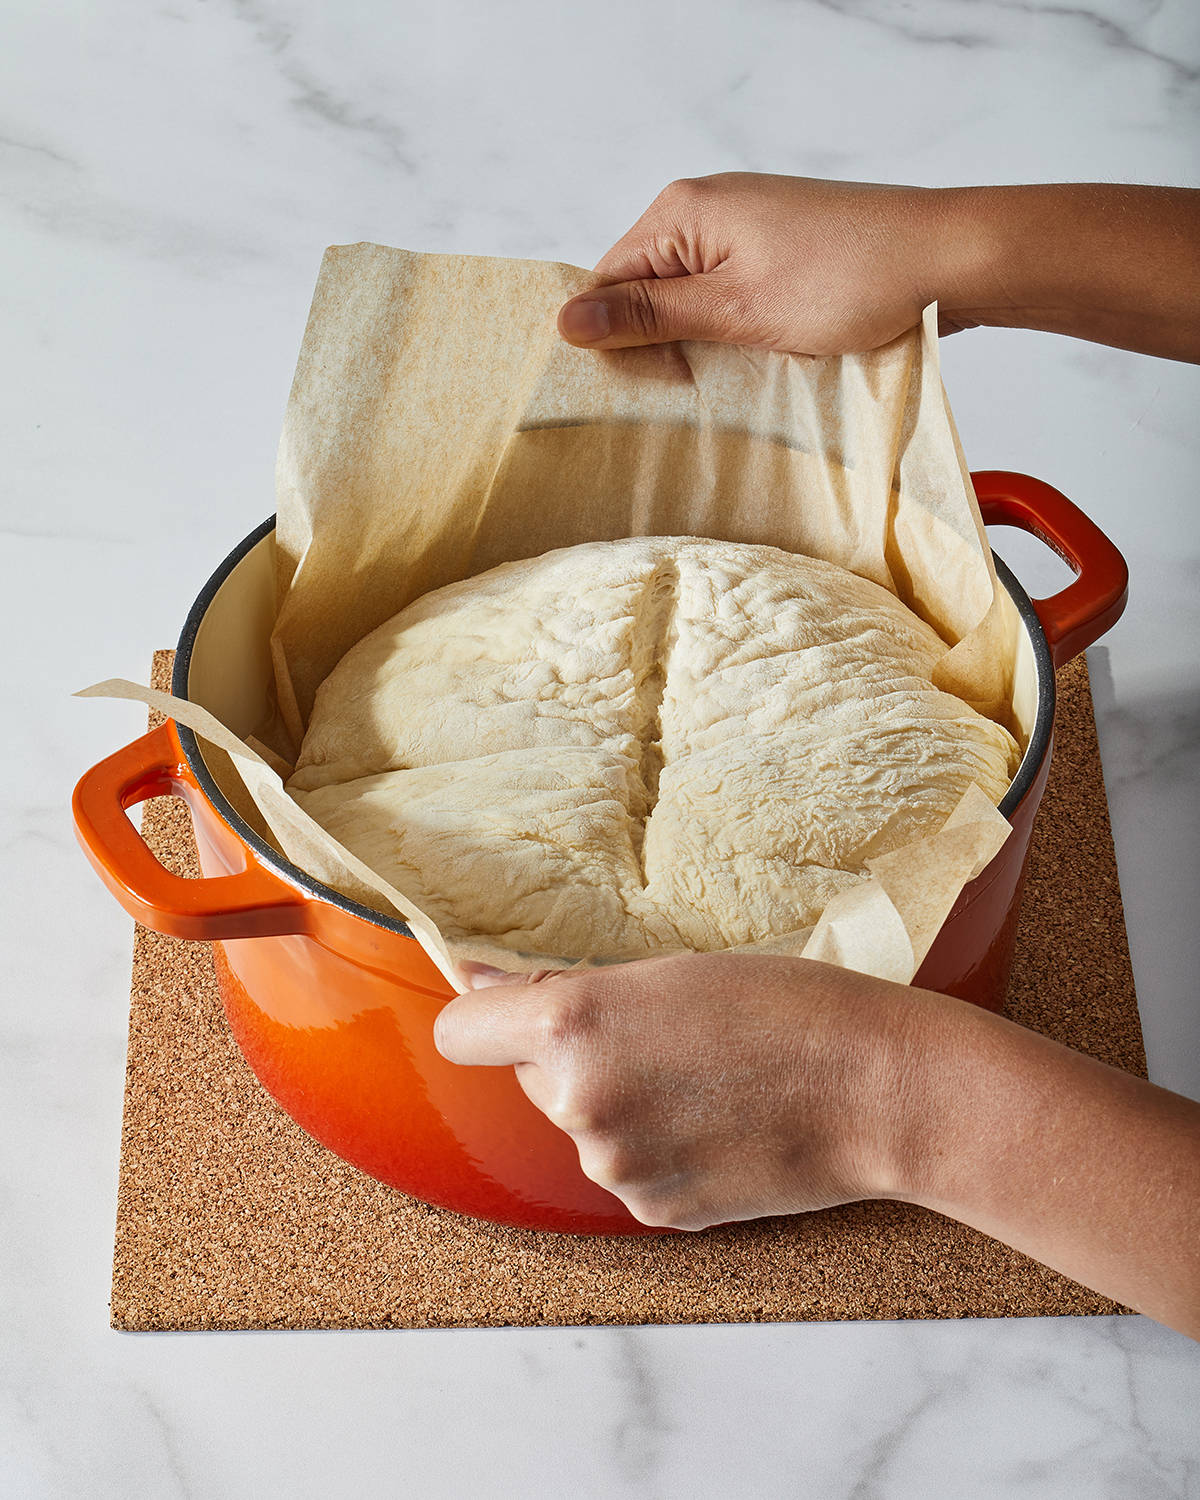
1 tablespoon extra-virgin olive oil StepsIn a large bowl, whisk together the flour, yeast and salt, plus grits and flaxseeds (if using). Make a well in the center of the flour mixture and add the water and olive oil. Using a wooden spoon, stir until a shaggy, wet and sticky dough forms. Cover the bowl with greased plastic wrap — greased side facing inside the bowl — and leave at room temperature for at least 8 hours and up to 14 hours. The dough will rise and bubble and flatten across the top. Toward the end of the rising time, place a 6-quart Dutch oven and lid on a rack in the middle of the oven. Preheat the oven to 450 degrees. Generously flour a clean work surface and, using a rubber bench scraper or lightly greased silicone spatula, scoop the dough out of the bowl onto the counter. The dough will still be very wet and sticky, but there's no need to knead it — just flour the top and sides to keep the outside of the dough dry enough to shape it into a roundish ball by pulling the edges to the center of the dough. You can use the bench scraper to assist in the folding. Flour a 14- to 16-inch piece of parchment paper. Cupping your hands around opposite sides of the dough, gently but decisively transfer the dough to the paper, fold-side down. Dust with more flour wherever sticky dough becomes exposed and loosely cover with a clean, dry kitchen towel. Allow to rest for 30 minutes. The dough will have risen slightly and should bounce back when gently poked. Remove the Dutch oven from the oven and set the lid aside. (I like to keep pot holders on the lid and handle of the Dutch oven to remind myself it's very hot.) Lift the towel off the bread and, using a serrated knife, slash two vents into the surface of the dough to make a big "X." Holding two sides of the parchment paper, lower the paper and dough into the hot Dutch oven. Re-cover the pot and place in the oven. Bake for 35 minutes, then remove the lid and bake for another 20 to 25 minutes, until the bread is golden brown across the top and sounds hollow when tapped. Remove from the oven and let cool in the Dutch oven for 15 minutes, then transfer to a wire rack and cool for 1 hour before slicing and serving. The bread is best within 2 days of baking but will keep, well wrapped, at room temperature for up to 4 days. Nutritional facts per serving: Calories: 150; Protein: 5 g; Carbohydrates: 27 g; Fat: 2 g; Saturated Fat: 0 g; Cholesterol: 0 mg; Sodium: 200 mg; Fiber: 1 g; Sugar: 0 g. Did you make the recipe?We want to see how your bread turned out! Share your Baking Basics creations with us on Instagram with #eatvoraciously. Keep those photos coming and follow the lead of our pals LaCouronne (what a gorgeous pie!) and Jeremy (who just made his first from-scratch cake!). Next week: An irresistible pecan sticky roll that captures all our favorite flavors. Have a question about the recipe?Email us at voraciously@washpost.com or message @eatvoraciously on Instagram. If you're having trouble viewing or receiving this or other newsletters from the series, or have other email tech questions, drop us a note here. Visit Voraciously.com for recipes, how-to guides, the latest food trends and much more. Joy Wilson is a self-taught baker turned professional, food photographer and cookbook author. She is the author of "Homemade Decadence" and teaches baking workshops at her studio, the Bakehouse, in New Orleans. Find her at @joythebaker on Instagram and Twitter. |